Quantcast
Channel: Man Made DIY: David's posts
Viewing all 412 articles
Browse latest View live

David's Shop Upgrade on a Budget: Step 2 - Breaking it into Phases

$
0
0

Before Pic of WorkshopI'm finally re-vamping my cluttered, dark, dis-organized shop on a budget. Big projects need to be broken into manageable pieces. Here's the process I'm going through to make sure my budget shop upgrade comes together right.  
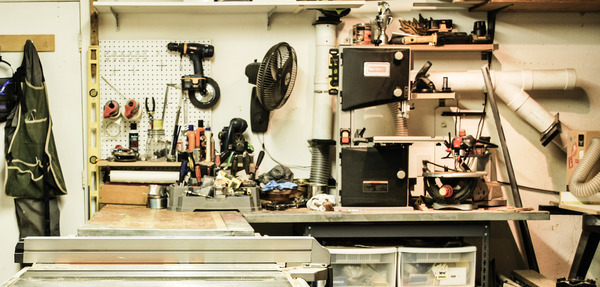
I've been thinking about my shop upgrades for a while now. I've sketched, measured, dreamed, and worried about it for years, and now that I'm actually starting the build it's time to break it into pieces manageable enough to get done without going bonkers.  My uncle told me a few months ago "make sure you design it for when you're in the middle of a project, not for when everything is all neat and tidy." That's important, because it doesn't matter if it looks good but can't be functional. I've thought quite a bit about work flow, and design. Tools are spaced far enough apart to keep from overlapping, and all counters are the same height so materials can move from one place to the other easily.

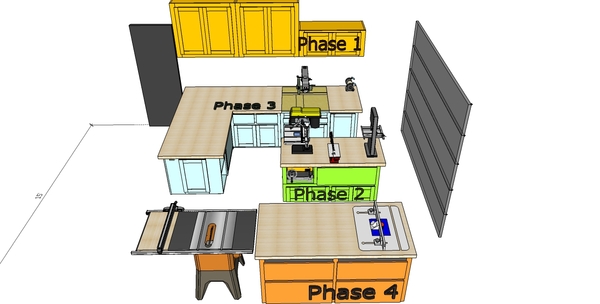
The key to a good plan is to start at the end and back into it, so I've taken some time to really get into the project with a detailed SketchUp model. Here's a look at the finished (hopefully) project, complete with scale tools:Final SketchUp Plan

Now the key is that I've built each component to the point that I have a material list for each piece of the cabinet. I designed them separately and then imported into the model to be able to measure and plan each piece at a time. After that, I broke the project into 4 Phases to make sure I have the materials needed for each portion of the project. Here's what that looks like:

Phases of Construction

Now the first step over the next week will be to completely destroy the shop. Everything will come off the wall, off the floors, and out of the shelves so I can deep clean all the dust out and only keep what I need. This is a huge and important first step that will allow me time to figure out what junk I've kept for way too long. After that, we'll jump into the first phase:

Phase 1: I am planning on tackling the wall first to start the organizational process. By adding a huge amount of open space on the wall, I will be able to clear out the shelves and start to get things into their place. I will also be painting the walls, and re-routing the dust collection and air compressor line so this phase is where the momentum for the next few comes in. $130 in materials

Before Dewalt Planer Island

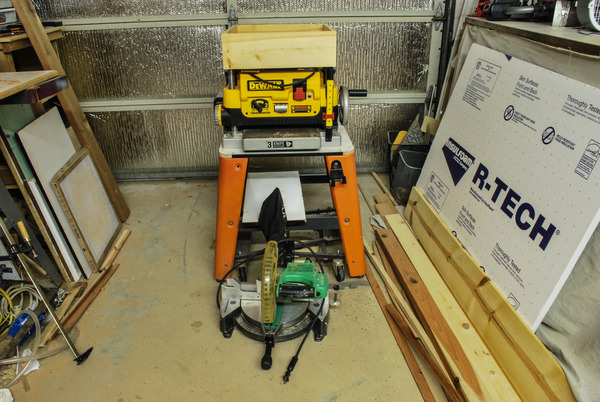
Phase 2: Building that tool island will be the next step, giving me a place to park the tools that crowd my countertop right now. Right now, the mobile base is a pain, and honestly it looks pretty sad. I especially like the place where I've put the planer, out of the way but still useful. By leaving a space open below the top counter, and installing casters on the island I can dimension and finish wood with full out-feed support. Not sure how well I will like the low position of the tool, but at over 100lbs, I know that I don't like hefting onto my bench to plane a few boards. The challenge of this step will be to set up power and dust collection in a way that is accessible but not in the way. I'm tired of stepping around cords and hoses on the ground, so suspended from the ceiling is likely the way to go but I will need to keep clearance for the garage door. $120 in materials.Wasted Space Radial Arm Saw

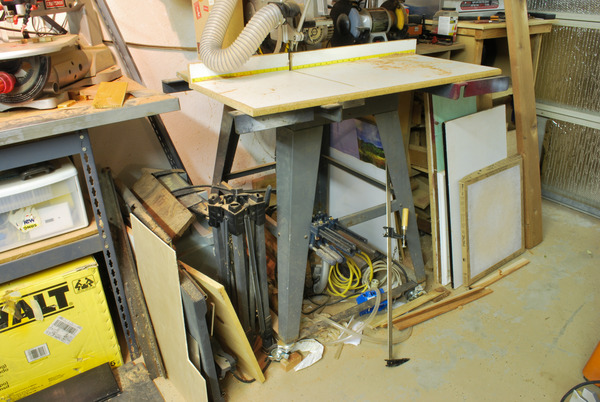
Phase 3: This is the largest phase of the project for sure, with a full tear out of existing shelves and a warped bench top. I will also be embedding my radial arm saw into the countertop for a large supported cutting surface. That sure beats the current set-up above with all that wasted space. I've designed the whole thing into modules 4 of which all have the same basic carcass with different face frames and doors. I'll build 8 drawers, about 12 doors, wire up about 6 outlets, and then lay a huge countertop on the entire thing. $300 in materialsOverall Before Shot

Phase 4: My last phase will be all of the wrap-up that comes with a project, clean-up, rearranging, and final touch-up. I will be cutting down and re-sizing my current 4x8 workspace to about a 4x5 space with the table saw on one end and the router table on the other. I'll be working on some dust collection routing, and adding face frames and doors to the frame to stiffen it up and provide some dust-free storage space. $50 in materials

So my total budget for this project is about $600 and that's pushing it. That's another benefit of breaking the project up into smaller phases, you have the ability to work as the budget (and time) allows, but you don't have to live with half-finished projects for too long.

Final thought:

After all the planning, I realized that I haven't taken into consideration 2 important items: sheet good and clamp storage. Both items have the potential to take up some serious room, so I'll be doing a bit of wrangling (or may just build a bit of protected storage outside). Take the time to sketch out detailed plans on the process and pieces to get a good idea of where the challenges are and also where things can be broken up into manageable pieces. I love SketchUp for this, it's a free and very robust program that gives the ability to develop something in 3D detail that is great for planning and visualizing a space. I talked last week about learning some of the basics here, and look for our piece on advanced model development for woodworking next week.


How to: Upgrade Your Moleskine With A Leather Cover

$
0
0

Leather Tools This inspiring video walks us through the making of a smooth leather cover for the Moleskine notebook. Watch as a simple piece of leather becomes a classy cover for all those world-changing thoughts.   I've carried a pocket notebook with me for years. It's been a constant message to me that my thoughts matter, that I have something to say, and also that I need to keep track of my grocery list. This little notebook means a lot to me, so a protective cover makes sense. Here's a beautiful video of Kinnari leather crafting a simple but complex cover for his Moleskine.


What I love about the video is the variety of tools and techniques it took to make it something amazing. Leather working is a fully hands-on craft and there will always be something special about that.

Skip The Takeout, Make It Yourself: 5 Restaurant Recipes that Taste Better at Home

$
0
0

I'm a big fan of takeout, just make a call and the food is ready to munch within a few minutes. Like most people, I have my favorite meals that define the restaurant for me. They are the go-to picks that I get and leave happy every time. But what about the joints too far away to make a call and grab what you want when the urge hits?

A few years ago, my wife found a few copycat recipes so we could make some amazing lettuce wraps at home instead of driving a few hours south for the meal. After that, we found a few others, and now we can make them anytime we want, no takeout necessary.

Keep in mind, these are not the approved recipes, they are copycats that come close to the original, and oftentimes, taste better with fresher ingredients. Here are a few of my favorites:

1. Panda Express Chow Mein  - I'm a sucker for a good Chow Mein, and this is a great one. Although there are a lot of ingredients, it's much easier to make this meal than I thought, and the taste? Fresh and Delish.

2. How to Make a Burger King-Style Whopper Truly Fit for The King - You've never seen a Whopper that actually looks like that... except in ads and commercials. That's because they're never actually that beautiful, or tasty. This one most certainly is. 


Zuppa Toscana

3. Olive Garden Zuppa Toscana Soup - This spicy, sausage-heavy soup has a creamy broth and plenty of wilted spinach for a true Italian spin that will have you slurping the bowl clean on your way back for seconds. We make this in the crockpot and coming home to the smell of Italy is a great way to end the day.

4. Almost-Chipotle's Corn and Roasted Poblano Salsa- Cooling, refreshing, and full of flavor. Exactly what you want to eat this time of year. Serve on everything. 


Lettuce Wrap5.P.F Chang's Chicken Lettuce Wrap - This is the recipe that started me down the culinary road to begin with. P.F. Chang's is too far away to enjoy on a regular basis, and that is a major issue for me because these, honestly, these wraps are amazing. The Asian influence gives these a salty, tangy, and very spicy flavor that I can't get enough of. We use turkey sausage instead of chicken because it's easy to find.

 Do you have any favorite copycat recipes you like to make from the comfort of your kitchen? We'd love to hear about it!

You Actually Do Have Room For A Pool

$
0
0

Small Pool Plunge

When the weather turns hot, it's always nice to find some water to take a dip. The most convenient way to cool off, is to have a pool right outside that slider but most of the time there just isn't enough space for our own personal oasis, or is there?   It's summer, so my mind is on the water most of the time right now, and so it's no surprise this post caught my eye. These small pools are generally called plunge pools as they are mostly deeper than they are wide, but as long as it get me wet and cooled off, you can feel free to call it whatever you want.Small Backyard Pool

So go take a look at your backyard with fresh eyes and figure out where to put that little concrete-cast plunge pool, it's too hot to not have a little piece of water out there.

Take a look at all the pools here.Backyard Pool

Skill Builder: How to Lay Out a Woodworking Project in SketchUp

$
0
0

Cabinet LayoutSketchUp is a great program for getting a project started. From the 3D visualization, all the way down to generating cut lists here's an overview on how it works for us woodworkers.   I've been working hard on planning out my workshop upgrades over here. It's been a long time coming and I'm so happy to be started. SketchUp has been essential to making my shop at least a virtual reality at this point. I've laid out each component in it's own model and now I've been able to measure, adjust, and generate a material list and cut sheet for each part of the project. I just finished building my carcasses for the hanging wall cabinets and can say I had almost no adjustments to do in the shop that weren't already laid out well in the model.Exploded View

For the basics of the program, take a look at my previous post first on Getting Started With SketchUp For Woodworkers and Makers.

For this article, we'll assume you have a working project with all dimensions properly entered and all pieces grouped into components. Also, something very important for generating a cutlist, make sure each component is named appropriately for identifying it, and if it is a sheet good, add that into the name (such as MDF or plywood cabinet side). This naming ensures the program will properly identify and lay it out on sheet materials.SketchUp Screenshot

The first tool to use for getting accurate measurements is the tape (T) this virtual tape measure lets you get on-screen measurements of each component. To put labels on the pieces, use the dimension tool. This tool adds a visual measurement to the side of the piece for easy identification. This is useful for laying out outside dimensions of pieces for a piece (such as my cabinet) for when printed pictures will be included in the plan drawings.

The program I use within SketchUp is an extension called CutList. It's available via the extension warehouse at "Window > Extension Warehouse" within the program. This add-on generates a cutlist for whatever components are selected, with plenty of options to customize the dimensions and output files.

Another useful tool, are the scenes. These allow for the user to create customized "exploded" drawings that let you see each piece of an assembly using scenes and layers. I will point you in the direction of Mattias Wandel for a thorough overview:

So what are you waiting for? Go here for your completely free program and start creating today.

ManMade Essential Toolbox: Getting Started In Leatherworking is Cheaper Than You Thought

$
0
0

Each week in 2015, ManMade is sharing our picks for the essential tools we think every creative guy and DIYer needs. We've selected useful, long-lasting tools to help you accomplish a variety of projects, solve problems, and live a hands on lifestyle that allows you to interact with and make the things you use every day.  

Leather StringLove the thought of making useful and beautiful pieces out of leather? Here are the first few steps to get started down the path of making your own essential carry pieces and everyday items from that timeless and durable material.

I've always loved the feel of leather. It's strong and longlasting, but still has the supple texture of natural materials. And my favorite part, it ages well. I love to look at pieces I own and feel the years and experiences that softly made their mark on my life. As a maker, leatherwork is one area that I hadn't done much with, mostly because I just didn't know where to start. But I've been embracing the craft, and put together a getting-started sized tool kit that'll have you turning out goods in no time. 

Essential Tools: As with any pursuit, the tools can make the process faster and more precise, and greatly impact the final product. But don't think that skill can't be built with the basics. Start with a small set of the essential tools, and move up to better, more specialized pieces as the need arises. This is the best way to avoid spending money on tools that you never use.

Leather Straightedge1. Knife - A sharp and precise knife is important for accurately slicing those pieces to size. Have a medium #2 X-Acto knife for the small cuts, and a larger moredurable break-away razor utility knife for more comfortable cutting on the bulk of the pattern.

ManMade Recommended:


2. Needles and Thread - The needles used for leather stitching are large, with a triangle shape to push easily through the animal skin, and have a large opening to accommodate thick thread. Thread comes in such a variety, it's hard to know where to start, but get a medium strength Waxed Black and Brown for some variety.

ManMade Recommended:


3. Hole Punch - This is a must to cleanly cut holes of different sizes in the leather. Bump up in quality a bit here for less hand fatigue and cleaner holes. Also in this category is the flat chisel. This tool punches small holes in a line for stitching, ensuring evenly spaced holes for a clean finished look. Get a set to make the punching go faster but also be precise in the corners.

ManMade Recommended:


Leather Working4. Work Surface - A clean, flat, and forgiving surface is great to make sure everything laysout right. Cork is a soft, grippy, and natural surface that works great, but can get torn up rather easily. If your workspace is used for more then just leather work, go for a pvc cutting pad so you can move and store it easily. Not as soft or grippy, but it is self healing and will survive some abuse.

ManMade Recommended:


5. Leather - Getting the actual materials can be a bit daunting. How do you know what you want and how much of it? Start with enough for a small project like a book cover, which is about 1-2 sqft with plenty of leftover scraps. Pick cow hide to start as it is soft enough but still has plenty of structure.

ManMade Recommended:


In addition to these tools, expect to grab a few from your workshop:


  • Needlenose pliers
  • Straightedge
  • Marking Tools (fine tip sharpie)
  • Awl or screwdriver (to wrap thread around and pull tight, smooth down edges, etc.)


Did you find this list helpful? Did I miss anything? We'd love to hear from you on what tools you think are indispensable when getting started.

We'll be making a few started leather pieces in the next few weeks, so stay tuned for great ways to use your new starter set!


Mosquitos Bugging You? Get a Bat House

$
0
0

It may seem a bit strange to encourage bats to nestle down by your house, but if mosquitoes are cutting your evenings short, it's a natural resource worth considering.   Bat House

Like most of human history, I've always seen bats as strange creatures. They come out at dusk with the squeaking and head off into the sky to search for dinner. Apparently, these dudes  can eat up to 1000 mosquito sized bugs per night, and once I heard that, I'm seriously considering encouraging bats to live around my place. Bat House

Building a bat house looks like a pretty easy project for the weekend, here are a few sites to find plans to make your own:

1. This Old House

2. Bat Conservation Organization

There is also a simple house available on Amazon Here:

Cedar Bat House $45

So head out this weekend and build a home for your new backyard guardians.

David's Shop Upgrade on a Budget: How to Build Affordable Shop Cabinets

$
0
0

Laying Out the Cabinet Pieces
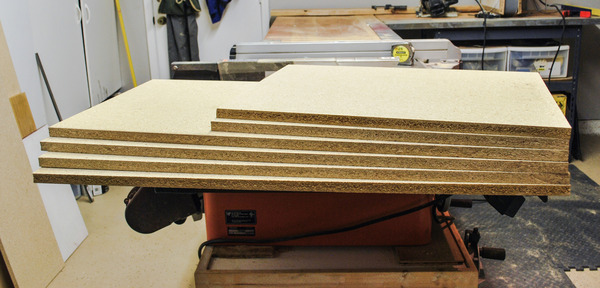
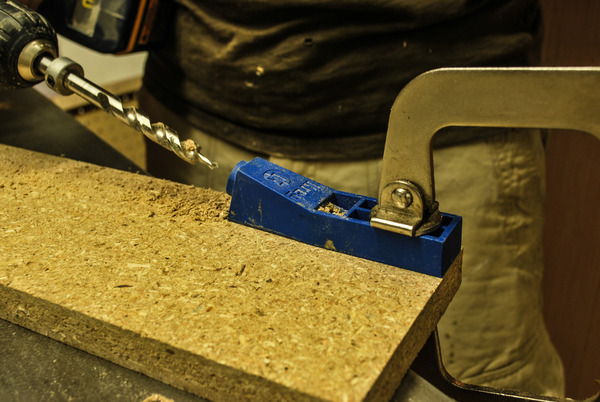
It's time to actually build something for the shop upgrade. First up, we take a look at how to build wall cabinets from scratch (sheet goods at least).

The first phase of the shop upgrade meant clearing off the counter tops, removing all shelves, piping, and a thick layer of dust, and then painting the entire wall. Here's a look at what I ended up with when I cleared it all off (before I stripped all the shelves and other pieces).

Wall Clearing

I realized about halfway through the project that I have kept too many small items – pieces of wood, random screws or fittings, and cheap tools I never use. This was the perfect time to purge a huge amount of junk. 

Scattered Junk 
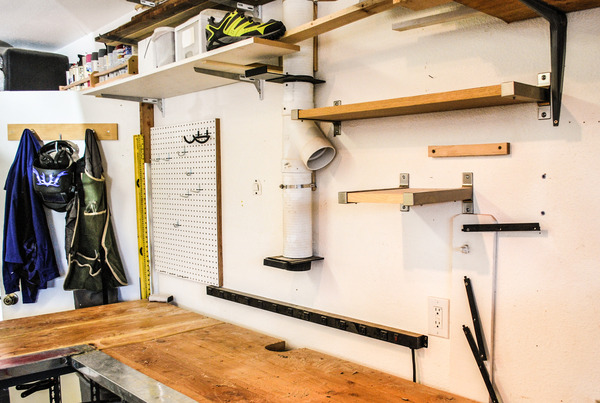
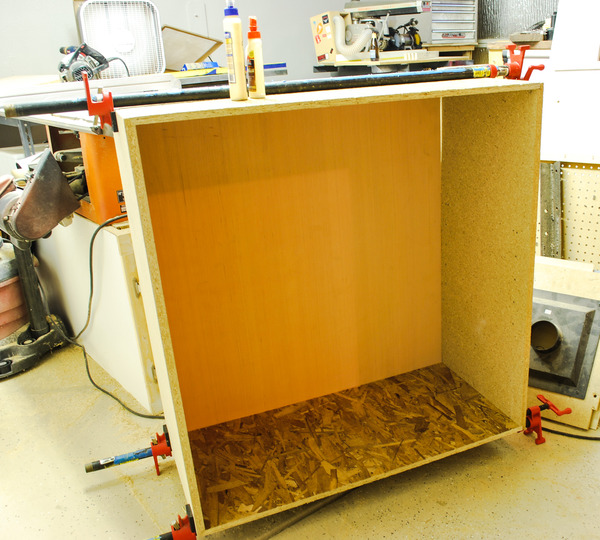
The clean slate of a freshly painted wall was the perfect background to build my three wall cabinets.

Fresh Painted Wall
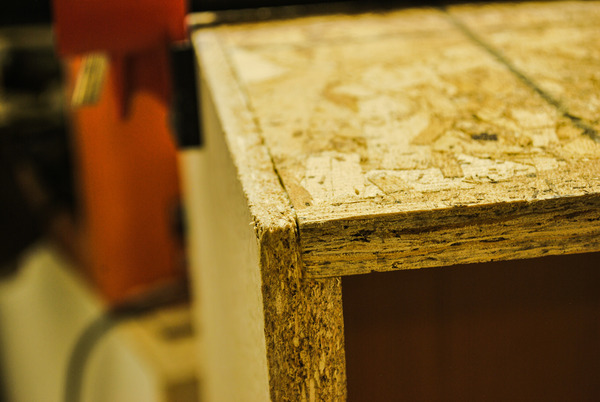
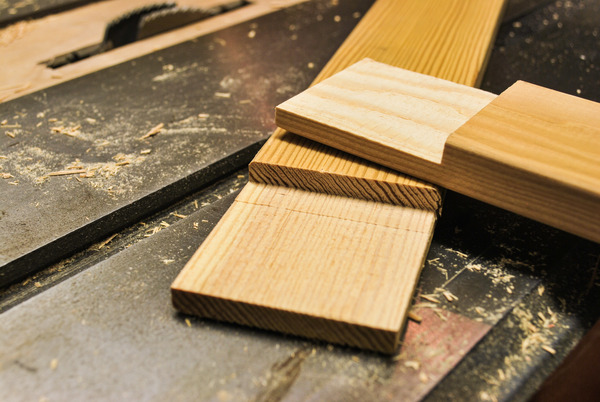
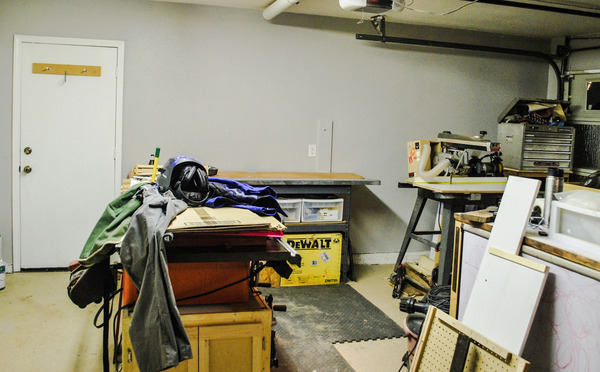
I built my cabinets in three distinct pieces: The carcass, the face frame, and the doors.

Cabinet Carcass

The Carcass:

The carcass of a cabinet is the rough box that is covered by the face frame.I made two identical boxes, with the third shorter but the same width. This meant that the tops and bottoms for all 3 cases were the same dimensions, and the sides and backs were identical for two out of the three which cut down on measurement time. To construct the boxes for the cabinets, I used ½” plywood for the top and bottom, ¾” MDF for the sides, and ¼” ply on the back.

Sheet Goods

  1. Break Sheet Materials into Manageable Pieces – The first step working with sheet goods is to break the pieces down into pieces that can be handled in the shop. I elevated each sheet off my workbench with boards, and adjusted my saw depth to keep from digging into the work surface. Cut the pieces to rough dimension and finalize the pieces on the table saw so they are all squared up and evenly matched.Glued-Up Joints
  2. Cut the Grooves and Joints – The cabinet frame will be much stronger with notches in the joints instead of face gluing. I used a Dado blade to cut ½” rabbets in all 4 corners (top and bottom of each side) about ¼” deep to match the panels. Cutting Grooves With Dado Blade
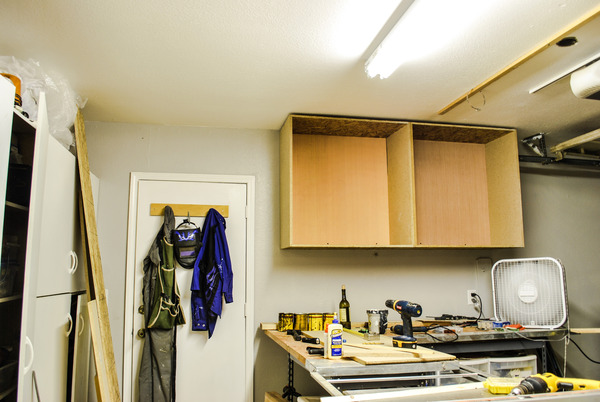
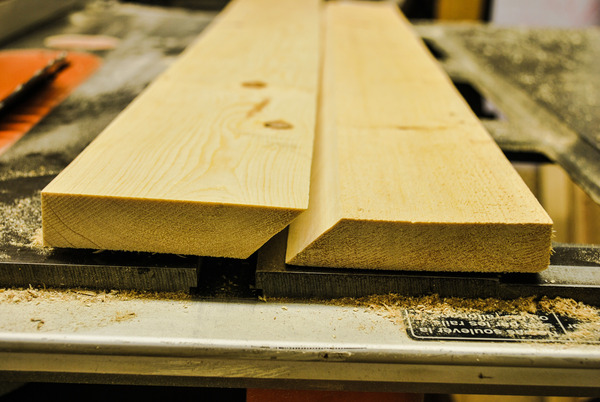
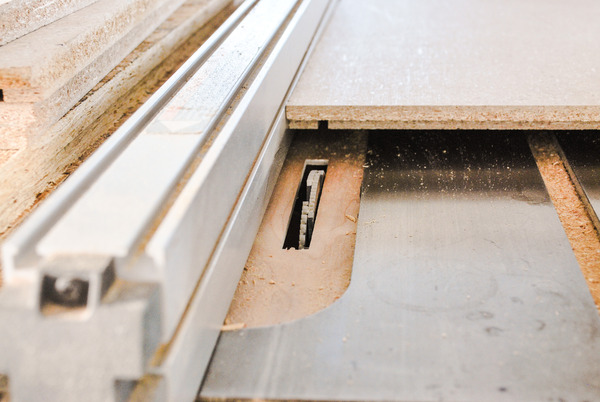
I also cut a 1/4” groove ¾” from the back edge on all pieces to account for the plywood back panel and to give room for the mounting boards to integrate on the top and bottom.Kreg Pocket Hole Jig
  3. Add the Shelf Pin Holes – I used my Kreg Cabinet Pin Jig to drill all the holes for the shelves. The best way to do this so they line up is the use an index board so you can position the jig at the same spot relative to the edge on each piece. Be sure to make the top and bottom of each side so the holes are level across the case.Glued-Up Cabinet Carcass
  4. Glue Up all Pieces – Gluing all pieces up takes a few hands, or at least plenty of preparation. I used two large pipe clamps on the bottom and two on the top to make sure the joint was strong.Pocket Holes
  5. Add the Mounting Boards – The mounting board gives the cabinet a strong frame to mount it on the wall. It’s important that the board is well secured to the cabinet frame, so I used pocket holes and glue to install it in place. The groove I cut in the back of the frames for the back panel were exactly ¾” from the back edge, creating a small relief where the ¾” mounting boards fit perfectly.Mounting Boards
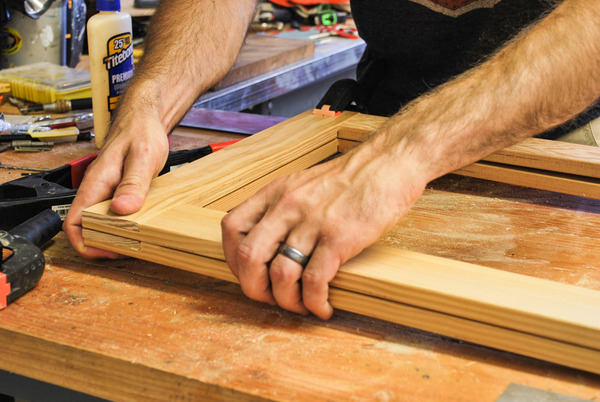
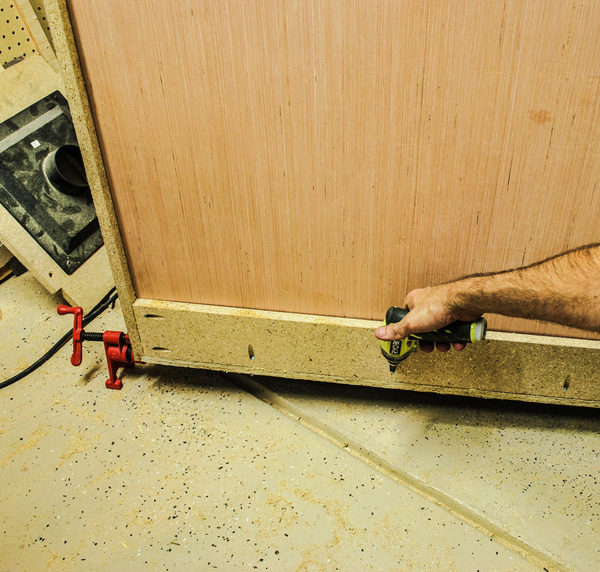
You can drill mounting screws directly through the back panel into the wall studs, but I prefer to use the French cleat method. This is a great technique for a few reasons: first, it’s much easier to line up the French cleat level and at the right height than it is to get the cabinet in place and drill through the panel into the stud. Second, there is some side-to-side play with a French cleat so you can snug up the cabinets to each other. Lastly, it’s a strong joint that holds well but can be easily removed in the future if things change.

 French Cleat

To build the French Cleat: The French cleat is simply two boards with corresponding angles on one edge. I cut mine at 45 degrees each. One piece was cut to width to fit snugly in the cabinet behind the back panel along the top edge. This pieces has the angle facing the cabinet. The mating piece was cut about 25% smaller to give some room for adjustment. French Cleats Cut At Angles
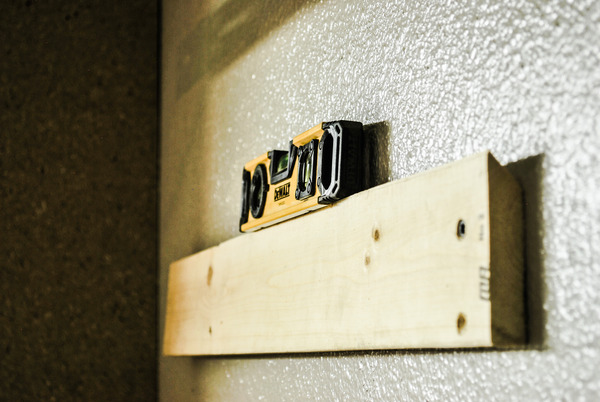
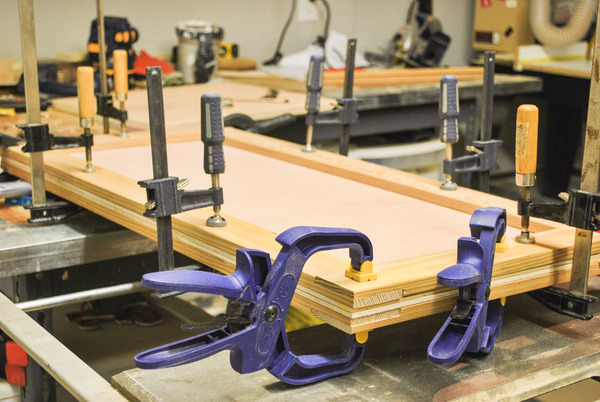
This piece was mounted with the angle facing the wall leveled with 4 long screws through the studs for support. Once it is installed, it’s a simple matter to put the cabinet on the wall and lower onto the cleat for a sturdy mount. I add two screws through the bottom mounting board along the bottom edge to keep it secured to the wall.

I did this for all three cabinets, mounting them securely to each other and connecting together with a few small counter-sunk screws to hold it all securely on the wall and to each other. Next, I added the face frame.Face Frame

The Face Frame –

The face frame is a simple wood frame along the outside front of the carcass to hide the plywood edges and to give hinges something to securely mount to. It is generally thin wood held together with pocket holes or simply glued and nailed to the front of the cabinets. The side pieces are cut to height, and the horizontal pieces are cut to fit for a seamless look. Be sure to account for door overhand and hinge mounting when deciding how wide to make the frame. I used 2.5” pine boards for my frame.


The Doors – I will be building the doors next week for the cabinets, here’s the plan:created at: 08/03/2015

In the interest of cost, I’m building my shop doors out of ¼” plywood, with a decorative pine frame over them for strength and rigidity. These doors won’t win style points, but will keep out the dust and clean up the overall look of the shop.


  1. Measure the Openings – The doors should overlay the openings on all sides by about ½” to ¾” if using overlay doors. Measure the opening and add the overlap on all sides to account for a final dimension for the doors (except where there will be double doors, then only add the overlap to the outside dimension).
  2. Cut the Panels – With the door dimensions calculated, cut the panels to final dimensions. I’ll add ¼” strips along the sides of the doors to clean up the look, so I deducted this measurement on each side from the panel dimensions.
  3. Cut the Rails and Stiles – While not traditionally a rail and stile, I’ll cut ½” pine boards to make a frame on top of the panels to add a bit of depth and make the doors a bit stiffer. I used an overlap joint to make them stronger.
  4. Glue, Pin, Mount – Glue and pin the doors and let dry overnight, then mount them with face frame hinges.

Stay tuned for more updates every other week as the garage upgrades keep going. Next we'll talk about door installation, and Phase 2 - the rolling tool island.


Build This: DIY Affordable Dining Table for Six

$
0
0

X-Table PB Inspired
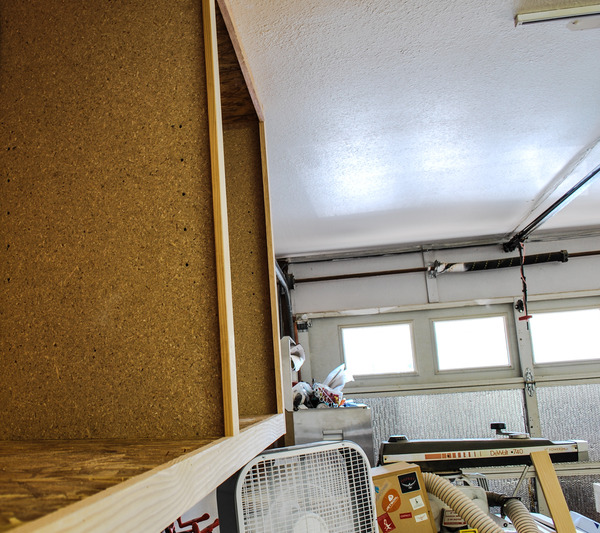
A few years ago my wife handed me a catalog and told me she "must have" the table inside. After I took a look at the design (and the price tag), I was inspired to build it myself.   While I love the style of Pottery Barn's furniture, it's never been in my budget to fill my house with their excellent products. But when my wife showed me the wide, welcoming table that would help us better entertain at our house, she was ready to make the purchase. Having just claimed the garage as my own, I was eager to make this myself. So despite my wife's doubt, I set out to make it.

At the time, I designed and built it inspired by the product page here. After plenty of work, here is what I now have in my dining room:My Dining Table

While it was a lot of fun to design the table, I've found a great link to a set of plans so you can build your own without the (multiple) mistakes I made. The guys over at Design Confidential have a full set of plans and plenty of steps to make the process as seamless as possible.

Take a look and let me know if you decide to build one yourself!

DIY Inspiration: Make a Custom Stand Up Paddleboard

$
0
0

Clearwood PaddleboardAs summer gives us just a few more weeks of dependable warmth, I’ve been hitting the water as much as life will allow. But soon enough it will be much too cold for getting wet and so here’s a project to get on now so when spring comes back around, we’ll be ready to once again enjoy a day on the water.  

Here is a great project for the long winter ahead – Build a Stand-Up Paddleboard.

There are a few ways to get started, plans, frame kits, or full kits. Let’s start with the most adventurous option first – the plan.Putting on the back

THE PLAN (about $100) – This is by far the most adventurous way to build the project. While the plans are generally very detailed, you still have to cut every single piece and getting it all done accurately is a beast. But if you have the time and love a challenge, get the most out of the build with a plan and a lot of sawdust.

While the plan option is a solid one, a CNC machine goes a long way to boost the accuracy and cut the time on your project. If that sounds good, then consider finding yourself a Frame Kit.Progess

THE FRAME KIT(about $250-$350) – The inner section of the board is made from a lightweight frame that keeps the weight down. This inner section needs to be precise for maximum strength, so getting a CNC kit makes it much easier to snap all the pieces together and get to the fun part – making the outside look awesome. So this option makes the precise part of the project a bit easier but still allows for the craftsman in you to shine. Building the shell still comes from the plan that is included with the kit, but you can pick the woods, patterns, and little embellishments that make it your own.Sanded Paddleboard

THE FULL KIT (from $650 to $900) – The last option is the full kit, which includes the plans, frame, and all the other pieces to build a fully functional stand-up paddleboard. The kits come with epoxy and fabric, or not, depending on if you have ready access to epoxy and fiberglass and associated hardware. This option is the most expensive up front, but it’s not necessarily the most expensive overall once materials are factored into the other kits. While it’s a bit easier than making everything from scratch, there is still plenty of skill and time involved to make this into something special.Putting on the fiberglass

So start clearing off a space in the shop and start looking into what option you plan on putting together while the weather turns cold.

Here are a few links to places you can find what you're looking for:


5 Table Saw Jigs Every Woodworker Should Have

$
0
0

taper Cutting jigI spend quite a bit of time setting up for projects on the tools. It’s amazing how much time it takes to make a few simple yet complex cuts. For the type of cuts that happen often, it makes sense to make a few go-to jigs to help with those annoying set-ups.   One of my favorite places to find jigs and other ideas is homemadetools.net. This massive encyclopedia is a great place to browse for ideas or search for specific items that you may find a need for. Here are three jigs for the table saw that will likely get used the second they’re done:

1. First, if you don't have an awesome crosscut sled, you'll want to start there. This one is a great beginner project.circle cutting jig
2. Circle Cutting Jig– The circle cutting jig is something that you don’t know you need until it’s done. From clocks to tables to wheels for toys, the wooden circle is very useful just about everywhere in the shop. The table saw is the most accurate way to cut a large wooden circle, and while it takes a bit of time and can get very dusty, it is a great jig to have hanging at the ready.

Taper Cutting Jig
3. Taper Cutting Jig– While tapers aren’t used that often, this jig will likely make it a much more common embellishment on pieces coming out of the shop. A simple taper lends just a bit of class to a piece, and this simple jig makes cutting one as easy as setting an angle and getting right into the cut.Box Joint jig
4. Kerfmaker Style Box Joint Jig– The box joint adds strength and style to boxes and drawers, and requires no special bits or tools. The key to solid joints is set-up and without an accurate and repeatable cutting jig it just doesn’t fit tight enough to be effective or beautiful. If you’re staring down a number of drawers on your project list, this jig is exactly what you should be building before tackling them.

5. A thin rip jig is an awesome way to create thin strips of stock for small parts, wood laminations, or square doweling. The finished piece is the offcut (the part that falls to the outside of the blade, not the fence side), which keeps the strips the same width, no matter where the fence is set. 

Do you have any favorite jigs that you use on the table saw, or other tools in the shop that you consider an essential to woodworking? We’d love to hear it!

Make This: Cast Iron Skillet Cinnamon Rolls

$
0
0

created at: 08/19/2015

That skillet isn't just for dinnertime...

In honor of breakfast week on ManMade, I decided to share one of my favorite early morning treats, a tasty recipe for cinnamon rolls cooked in the cast iron pan.   I'll admit it: I'm not generally much of a breakfast guy. I think most of that is because I just don't find much fun in that first meal; not cause the food isn't great...but let's face it: I'm just not a morning person. I know you non-morning people will agree it's just the fog of morning I just can't get past, no matter how tasty the food. 

Tasty Cinnamon Rolls

But this recipe is one worth waking up for. It takes that cast iron pan I use so often for dinners and makes it into a morning-fog busting meal that fills the house with the smell of a good day. Make it the night before and have it ready to toss in the oven while your stumble through your morning rituals.

Take a look at the full recipe here: A Peaceful Dwelling

The Art of the Dovetail

$
0
0

Beautiful JointI recently picked up a new dovetail jig to make some drawers. After getting the basics under control I took a look around at some of the more artful joints out there. I definitely have a ways to go.Double Dovetail1. The Hand Cut Double Dovetail - This joint is very involved, but with the right contrasting woods it really stands out. This tutorial walks through the complex steps of cutting and re-cutting the joint for a stunning reveal.

Rabbeted Dovetail

2. The Rabbeted Dovetail - This complex looking joint has a simple but classy look with dowels to pin it together. Look for the tutorial on this joint about halfway down past the sliding dovetail tutorial.

Funky Looking Joints

3. Sculptural Dovetail - These hand-cut joints have an incredible look that just shouldn't be hidden. This is just an example of how far down the road of art this joint can go. There's no tutorial on how this was made, but click on the link for a few more interesting angles.


5 Simple Beginning Leather Projects to Help Grow Your Craft

$
0
0

Leather Tool CaseA few weeks back we talked about some of the basic, essential tools for getting started in leatherworking. Once you're set up, its time to put them into practice. Here are a few projects to hone those skills, and end up with some great practical pieces you can use everyday   Each of these is a great starting place to help walk through the first steps of the hobby.

Passport Cover

1. Hand-Sewn Passport Cover - I don't travel enough to make this something I need. However, the few times I pull out that passport I already feel like a jet-setting fool, so why not feel like it in style. This project uses leather glue, layout and cutting, and plenty of hand stitching.

Leather Cup Holder

2. Mason Jar Mug Holder - I've got a few mugs in the cabinet that I really love. Thick walled and heavy duty, they are the perfect match to cold drinks on the patio. This project is a simple holder with handle to keep the liquid party colder longer. I love the crossed stitching and styled handle, so much potential for customizing each one.

Leather Roll-Up Case
3. Leather Tool Roll-Up Case - We all have plenty of tools that need a home. This simple project adds in a sewing machine if you're so inclined, but hand stitching is still a respectable way to go.

4. Leather Cord Wranglers - Keep your headphones, charging/syncing, and USB cables under control with this simple taco-style leather organizer.

5. DIY Leather Valet Tray- Keep all your daily carry items in the same place each night in this simple but stylish catch-all tray. Looks great on your dresser, night stand, or hall table. 

Make This: DIY Pocket Notebook from a Beer Case

$
0
0

DIY Pocket Notebook6 pack cases - we all have a few of those around, the remnants of a night with friends and now the perfect cover for your pocket notebook.   I always feel a bit bad about throwing out those artfully crafted 6 pack holders from my favorite craft brewery. I also use plenty of small notebooks at work and play so they tend to get ragged pretty fast without a nice cover.The Tools

This simple tutorial has just a few steps to turn a stack of paper and a 6 pack into a few  notebooks that show off a bit of your good taste in beer to your friends. Take a look at the tutorial here.


Great Cooking is All About Good Technique and Ingredients. Here are Two Solid, Standby Recipes to Win Dinner Every Time

$
0
0

Two recipes that highlight quality ingredients and essential techniques.
By the time you're thirty, there are a few things you really should know how to do, like fixing a flat tire, fixing a leaky faucet ... and fixing a meal. You don’t have to be an amazing cook, but every man definitely needs some standbys to pull out when guests are coming around. A dish or two he knows well, with ingredients and techniques he understands.

created at: 08/19/2015 To share our picks, we teamed up with Murphy-Goode Winery, who are enjoying their 30th anniversary this year. We chatted with their winemaker, David Ready Jr., to come up with two go-to dishes that pair easily with Murphy-Goode's classic backyard wines, one white and one red, that you count on to be a hit with any guest. 


created at: 08/19/2015


Grill-Smoked Glazed Pork Chops

Think of this as your go-to recipe when you want to eat outside, or bring the flavors of summer to a cold, dark winter evening. Serve with a bold red "cookout" wine like the Murphy-Goode Liars' Dice Zinfandel.

Prep Time: Start 1-3 days ahead if possible; if not, they'll still be great. 
Cook Time: 2 ½ hours total, 45 minutes active

Meat:

  • 2 cups apple wood (or similar) chips
  • 2-4x bone-in pork chops, 1 1/2-2" thick
  • Kosher salt and black pepper 

Glaze (yields about 1 ½ cup):

  • 1 cup apricot jam or jelly
  • 1 tbsp olive oil
  • 1 tbsp Brown Sugar
  • ½ tsp Cayenne Pepper
  • ½ dried thyme
  • Water as needed


This recipe has two skills that transfer well to other meals – smoking and glazing on the grill. Adding a light, smoky flavor imparts a rugged dimension to the meal, and a depth to otherwise lean pork. Layering a glaze at the end adds a succulent finish and texture. 

Fresh Raw Pork Loin Curing

Choosing the Meat – If you can get them, always grill with a bone-in cut (chops, loins). Smoking meat can dry out the cuts due to the long cooking time, so start with thicker cuts of meat (about 1 ½ - 2" thick). If you don’t see thick cuts in the case, ask the butcher to cut a few fresh from the loin. They'll be happy to oblige.


Salted Curing Pork

The Dry Curing Process – Pork is an ideal meat for "salting" (also known as dry brining), which flavors the meat Add a healthy layer of salt to both surfaces, and place uncovered in the refrigerator for 1-3 days. When it's time to cook, take the meat out and pat dry, brushing away any extra salt. Any seasonings or flavor added after this step shouldn’t contain salt, as it can overpower the meat. You can always add more. 


Soaked Applewood Smoking Chips

Smoking on a Gas Grill – Just because you own a gas grill doesn’t mean the hearty flavor of smoking is out of reach. I’ve used a few different methods to add smoke to my grilling adventures on a gas grill, including fancy smoke boxes. But, the easiest method is just a simple foil packet (or foil pan) packed with soaked fruitwood chips.

To prepare the package, soak some apple, cherry, or similar fruit tree chips in a bowl of warm water for at least 45 minutes (or up to 3 hours). Once the chips are soaked, take a doubled up piece of foil about 12” wide and place 2 cups of drained chips in the middle in a wide strip. Fold up the ends, and fold each side over loosely. Poke 4-5 slits with a knife on the top to help the smoke escape. Take the entire packet and place on the grill over medium-high heat for about 45-60 minutes before adding the meat. Don’t expose the packet directly to the flame, as it will burn up and lose all the chips. The goal is to get a sustained smoke that will last for hours, so let it heat up slowly.

The same technique can be applied to a charcoal grill. You can scatter the soaked wood chips directly on the hot coals. 

Seasoned Cured Pork Loins

Smoking the Meat – The key to a good smoked meal is to take things slow, so the smoked flavor has time to penetrate before it hits final temperature. The grill should stay about 225- 250 degrees Fahrenheit for up to 2 hours until the meat is 130 degrees Fahrenheit in the center. The cook time will vary so check often to avoid overcooking.

The best way to get smoke going without overheating the grill is to place the smoke packet on one side with the heat, and place the meat on the opposite side, without direct heat underneath, known as two-zone cooking. Flip the meat once or twice, and check the temperature every 15 minutes to make sure the grill heat stays consistent.


Apricot Glazed Pork Loin

Adding a Glaze – Glazing meat is a great way to add a final layer of savory flavor. To make the glaze, mix together a fruit jam or jelly like apricot (or peach) with just abit of oil, water, and additional flavorings like herbs or chili powder. The goal is a mixture that’s thick enough to stay on the meat without running off, but thin enough to spread well (think BBQ sauce). 

Sliced Applewood Pork Loins
Once the meat has reached an internal temperature of 130° F, place the chops over direct heat medium and apply a thick layer of the glaze. Let the glaze cook for about 5 minutes, flip the meat, and repeat. Cook to an internal temperature of 140° F. Then, remove the meat from the heat and let it rest wrapped in foil for 10 minutes. During this time, carry over heat will take the final temp to 145° F. 


Fish Tacos

For our white wine recipe, we're going with some amazing fish tacos. They're simple to prepare but big on flavor, and go great with refreshing, light white wine like Murphy-Goode's Fumé Sauvignon Blanc. created at: 08/19/2015

Prep Time: 20 min
Cook Time: 20 min

I don't remember the first time I tried fish tacos, but I certainly remember the best I've ever had. We were in Baja, Mexico, and after a long day on the water, we watched the sunset with a bottle of wine and two plates piled high with cilantro-laden tacos and plenty of laughter. These days, it’s still one of my favorite meals to share with good friends. One of the best parts of a taco spread is the ability for everyone to customize the meal, and it keeps the host with his guests, without spending too much time in the kitchen. Pair it with a well-chilled bottle of white for a relaxing meal everyone will remember.

Sauce:

  • 1 tsp dill seed
  • 1 tsp cayenne pepper
  • 1 tsp cumin           
  • 1 tsp dried oregano
  • ½ cup Greek yogurt
  • ½ cup mayonnaise
  • 2 tsp capers, minced
  • .5 oz (1 lime) fresh lime juice
  • 1 jalapeño chile, seeded and minced

Tacos:

  • soft corn tortillas
  • 2 lbs fish fillet (Cod, Snapper) (go for ½ lbs per person)
  • 4 cloves garlic
  • 1 tsp grown cumin
  • 1 Tbsp butter
  • 1 lime, juiced
  • 1 head red cabbage (chopped thinly)
  • 1 bunch cilantro, finely chopped (about 1 cup)

Avocado Salsa:

  • 2 ripe avocados
  • 1 cup diced red onion, rinsed under cold water for 20 seconds
  • 1 lime
  • 1/2 tsp cumin
  • ½ tsp Bay Seasoning

Seasoned Grilled Fish for Tacos

Choosing the Meat – Snapper is a light, flaky fish that falls apart easily and doesn’t have a strong seafood flavor. Grill in foil or bake it. This fish takes the seasoning well and cooks fast. Cod is a more solid filet with a more pronounced “fishy” aroma, but in a good way. (They are fish tacos, after all). It holds up well for grilling and frying, but the texture can get a bit rubbery if overcooked. Choose 4-6” fillets for best results. Fish is best fresh, but frozen fillets will do in a pinch.

Sauce Ingredients

Preparing the Sauce – First, mince the jalapeño and capers. Then mix the dry ingredients in a small bowl (dill seed, cayenne pepper, cumin, oregano) to integrate well. In a separate bowl, add all other ingredients until blended well.

Sauce Before The Mixing Add the dry ingredients into the mix and lightly blend together. Be careful not to over-blend, as the sauce can go from creamy to runny in a blink.


Preparing the Fish Tacos

Preparing the Fish – Rinse the fish and pat dry, then place in the middle of foil. Fold up the ends and add seasoning (lime juice, cumin, bay seasoning, garlic and butter). This can also be done up to one day before, but place fish and seasonings in a Ziploc bag and place in the refrigerator until ready to cook, and then transfer to foil.

Fish on the Grill

Cooking the Fish – After everything is prepared, take the foil-wrapped fish and put it on a grill heated to about 350° F. The key is to cook it fast to an internal temperature of 145° F, which should be easily flaked with a fork (about 20 minutes). Bonus for the grill - it keeps the heat and smells outside.

Another easy method if it’s a bit cold or wet outside, is to bake the fish for about 20-25 minutes in the oven at 375 degrees Fahrenheit. This method comes out a bit softer with less of the flaked goodness that the grill provides, but the taste is still perfect for loading up the tortilla. The last technique, in my book, is frying the fish with a battered coating. This method is a bit time-consuming, but the flavor is bold and the texture crunchy, and the likelihood of leftovers is close to zero. Whichever method you choose to cook the fish, the toppings will stay the same. So, try it out, and see which method you like best. 

Chopping the Cabbage

 Preparing the Toppings – I like all my toppings to be finely shredded, but not too that they lose their texture. This is finger food, so being able to load up the taco means keeping most toppings large enough to easily manage.

Chopping Cilantro Chop up the cabbage, cilantro, onions, and avocado. Section out the cabbage and cilantro into separate bowls and mix the remaining ingredients together.

AVacado Lime Salsa

We make an avocado-cilantro salsa that adds a nice zip of lime. It has the crunchy bitterness of fresh red onion that holds up well with large chunks of buttery avocado. Add together the onion, avocado, cumin and ½ cup of the cilantro in a single bowl and loosely mix; season with salt to taste. While chopping everything up, the tortillas can be heated in a moist towel on the side of the grill (not on direct heat). Toss them in a cast iron pan to keep them from burning (or throw them in the microwave).

Finished Grilled Fish Tacos

 A few notes:

  • This sauce is great on almost anything. Try it with grilled vegetables, chicken, or even baked potatoes.
  • If you want to add more heat, add 1-2 canned chipotles and 1 tsp adobo sauce to the mix. 
  • The best way to reheat corn tortillas for a crowd: wrap them by the dozen in one damp paper towel. Slide the stacks into a one gallon ziptop bag, and place, unsealed, in the microwave. Microwave for 1:30 per dozen at 75% power. Store in a clean tea towel or basket. 

Serving up Fish Tacos


 Both of these recipes work great during this late summer/early fall season, when its still nice to eat outside. But really, they're simply delicious, and an awesome option any time you want some great wine, great food, and great friends. 

Cheers.


created at: 08/19/2015

This post was sponsored by Murphy-Goode Winery. Thanks for supporting the sponsors who support ManMade! 


Build This: Make a DIY Wooden 3D Pantograph

$
0
0

I've seen a few of these interesting contraptions over the past few years, and really had no idea what they did. All I understood was that it created a copy of something at a smaller or larger ratio. Today I came on a plan to build a trim-router based pantograph that looks simple enough to tackle.  

Mattias over at Woodgears came up with a great design and walks through the steps of construction really cleanly and even offers a set of downloadable plans for an exact copy (for a price). His plan also allows for 1/3 and 1/2 ratio copies and a depth dimension for 3D copies. Finished Pantograph

Take a look as the plan here and if you're interested enough make it a weekend project!


Skill Builder: How to Get Started In Screenprinting

$
0
0

Screen PrintingWe all come in contact with screenprinted goods every day... there's a good chance you're wearing something screenprinted right now. It's is an impressive way to personalize just about anything you can think of, and it's really not that hard to start. Here are a few starter kits to help start down the road to making your own art and customizing everything you can get your hands on.   DIY Print Shop Kit

1. This first kit looks like a great value when just getting started. It comes with enough supplies to learn how to do it right. Quality on this t-shirt kit looks to be very good. $199Screen Printing Kit

2. Blick's kit is quite a bit more expensive but includes more supplies so after averaging that out it may still be worth the money. Still, it's a big hurdle to get into the hobby. $475

Amazon Screen Printing Kit

3. Amazon has a small starter kit without the lever action tool for tabletop printing. This affordable kit is a good starting point, but it is probably worth the extra coin to get the lever action for t-shirts and other fabric items. $99

4. Here's an assemble-it-yourself post that gets you started for around $75 (note: those are 2007 prices). This a la cart method allows you to get exactly what you need, and nothing you don't.

Here's a look at an inspirational screenprint overview from a guy who really knows the craft:

No matter how you start, there's plenty of creativity in the process and I can't wait to hear about the projects you're making with this new-found skill-set.


How to: Build Shop Cabinet Doors on the Cheap

$
0
0

Half Lap Joints
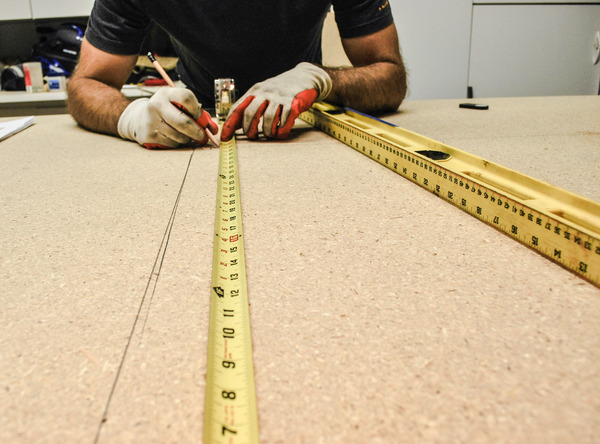
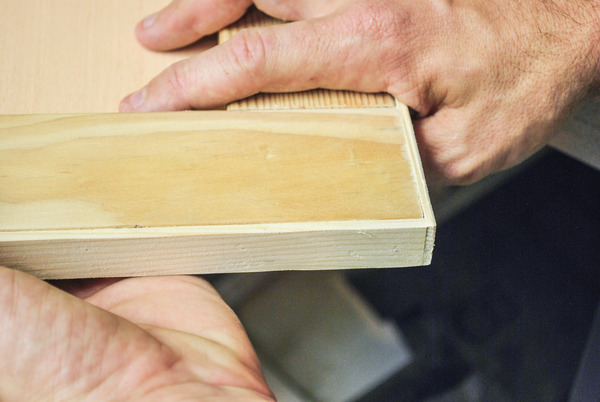
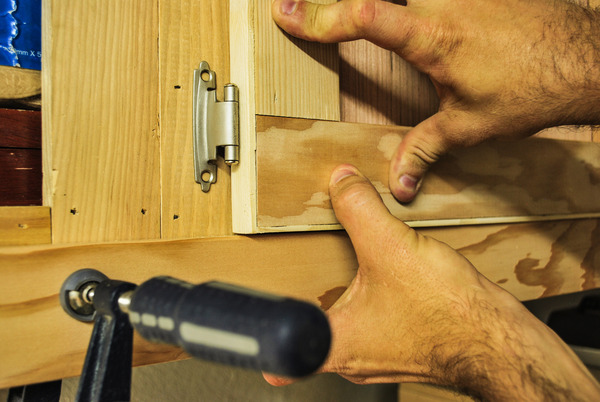
There are plenty of shelves in my shop that need doors to keep out the dust, and to keep the look of the shop more streamlined. These cheap doors are made from 2.5" pine boards and affordable 1/4" plywood. They still look great and function well, and they have enough heft to feel strong in your hand.  

Keep in mind, cheap wood can be hard to work with thanks to chipping, splitting, and warping, so choose nice straight boards that have been dried long enough to stay stable.

Here are the steps I took to make my affordable shop doors:

Cabinet Doors1. Measure them out - the doors should overhang the openings by about 1/2" on the outside edges and the top and bottom. This means you should measure the door openings, and add 1" for the top measurement and 1/2" for the hinge side of the doors.
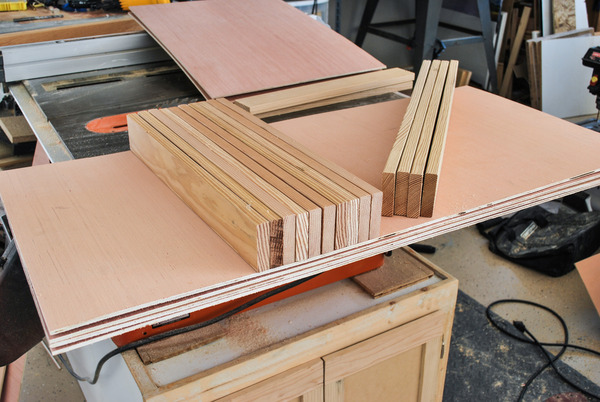
Backing Boards

2. Cut the backing board - These doors have a thin 1/4" backing board, with a frame over the top, and a thin strip on all sides to clean up the final appearance. To start, cut the backing board to size.Half Lap Joints

3. Cut the frame - The frame over the top is made from rails and stiles with half lap joints cut on the dado. This joint is strong and adds substantial gluing surface to make sure it stays strong and square.Gluing Pieces

4. Glue and clamp the frames - The frame pieces should match up nicely and should stay squared while clamping. Add glue and clamp overnight.Clamped Cabinet Doors

5. Glue the frames to the backing board - Apply a layer of glue around the edge of the frame on the inside and outside of the surface to be glued. Clamp evenly to make sure it is evenly applied. This took 3 clamps per side to make sure it was well glued.

Thin Strips

6. Clean it up - Take just a small portion of each side off with the table saw to make sure it is square and smooth for the final thin strips, then apply the thin cover strips - The last step is to apply the thin strips along the outer edge for a clean finished look. this step is not necessary if you are fine with the exposed joinery, but they do add a nice element to the finished doors.Installing Hinges

7. Install hinges and hang - Once the doors are complete, finish as you like and install hinges. I like these hinges from Amazon, but there are plenty of choices.Finished Doors

Since I will be making more of these for the bottom cabinets, I will keep them natural finish for now, but some finish should be applied to keep them from absorbing too much moisture during seasonal changes which will keep the movement of the doors to a minimum.

Now that the doors are getting installed, the next step will be to move onto the rolling tool island that will hold my planer, bandsaw, jigsaw, grinder, and maybe something else. It's a big build that will take a bit of time to get right, and I may have a vacation week stuck in there somewhere, but stay tuned for that update within the next 3 weeks or so!


The Traditional Art of Vegetable Tanned Leather

$
0
0

created at: 09/08/2015Bole Tannery has been making their own reindeer (!) and cattle leather goods from vegetable tanned leather in their Swedish workshop for generations. Take a look at what it means to create vegetable tanned leather goods from hide to final rucksack.   

Bole is the last spruce bark tannery in the world, working with Swedish cattle and Nordic reindeer hide to make products built to age with style. The folks over at Merchants and Makers took the time to talk with Bole about the process, and the in-depth story is worth a read. The quality of the products the tannery produces are incredibly classy, like this reindeer hide rucksack: Rucksack

And the incredibly upscale Double Minister Briefcase:

Minister Briefcase

For more great pictures and a great in-depth look at the tannery, take a look at their Interview here.

Tanning Leather

Viewing all 412 articles
Browse latest View live


Latest Images